Tight shoulders, and achy back? You’re not alone. In fact, back pain is the single leading cause of disability worldwide (1). But if you want to relieve pain in your back, you need to first understand why you have it.
Nearly everything we do, whether that is sitting at a desk all day, driving to and from work (which can be a two hour total commute for some), working in front of a computer or even cooking a meal, creates a situation where the chest becomes closed off – the shoulders round, and neck starts protruding. As a result, varying degrees of tension start to develop in our shoulders and neck.
That’s not to mention the back, which can also become compressed from long hours of sitting, where our posture might not be optimal.
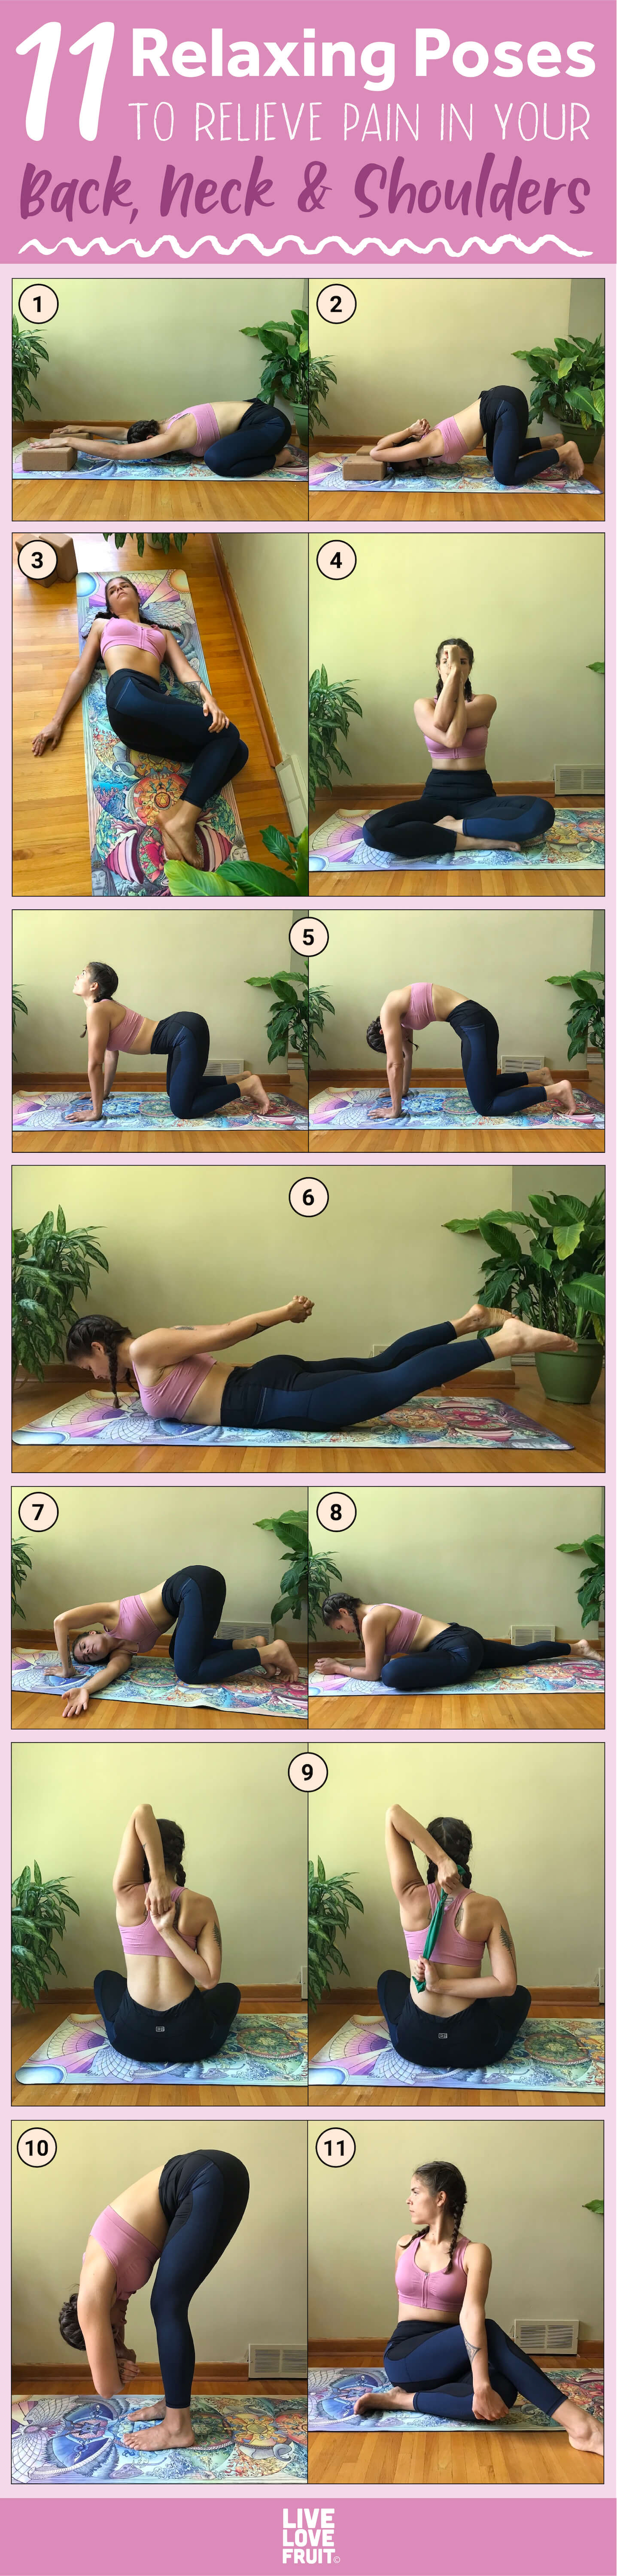
11 Poses to Relieve Pain in Your Back and Shoulders
The good news about all of this is that you can relieve pain in your back and shoulders – you just need to do a little work on your behalf.
Stretching is one of the best ways to help release tension and strengthen parts of the body that are weak. By stretching and strengthening, you can re-train areas of the body to sit back up right, and the tension will naturally dissolve by itself.
For these stretches, you’ll need a cushiony mat, and some yoga blocks (if you really want to get deep into two of the stretches – otherwise, they are optional).
Remember to go slowly into each stretch, and breathe deep to release tension in different areas of the body. You don’t have to be a pro to do these stretches, and you don’t have to go into the full position of each to do them properly. Do what you can, and with time, you’ll be able to get into the full expression of each pose.
1. Thread the Needle
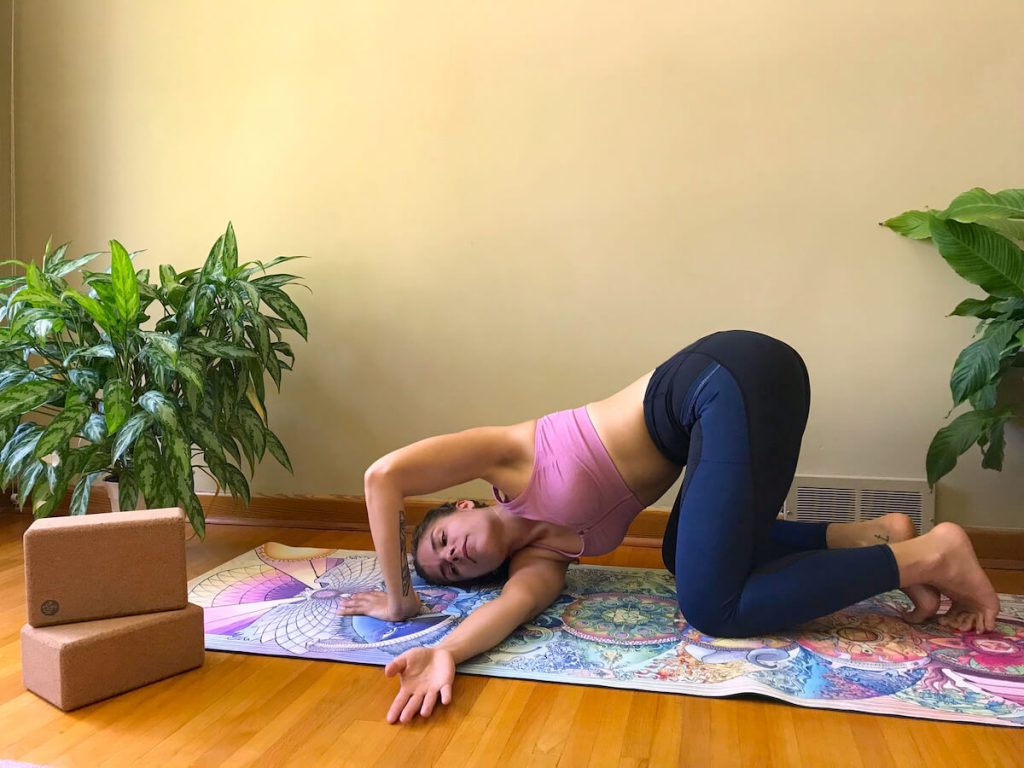
This pose stretches and opens the shoulders, chest, arms, upper back and neck. It releases tension we commonly hold in our upper back and between the shoulder blades.
1. Starting on your hands and knees, place your wrists directly beneath your shoulders and your knees directly beneath your hips. Keep your neck in neutral position, gazing downward.
2. On an exhale, slide your right arm underneath your left arm, with your palm facing up. Let your right shoulder come all the way down to the mat. Rest your right ear and cheek on the mat, and gaze toward your left.
3. Keep your left elbow lifting, and keep your hips raised. You will want to put your weight into your left hand – make sure you don’t put any weight into your head.
4. Let your upper back broaden. Soften and relax your lower back.
5. Hold for one minute, and then gently slide your right hand out. Repeat on the opposite side.
2. Cat & Cow

An excellent pose to re-align the upper thoracic spine and improve posture and balance. Helps to strengthen and stretch out the neck, hips, abdomen and back.
1. Start on your hands and knees, with your wrists directly under your shoulders, and knees directly under your hips. Keep your neck in a neutral position.
2. Inhale, and come into Cow pose by dropping your belly towards the mat. Lift your chin and chest, and gaze up toward the ceiling. Draw your shoulders down and away from your ears.
3. Exhale, and come into Cat pose by drawing your belly toward your spine and rounding your back toward the ceiling. Focus on really rounding the mid back. While doing so, release the top of your head toward the floor, but don’t force your chin to your chest.
4. Inhale, and come back into Cow pose. Exhale, and return into Cat pose.
5. Repeat a total of 10 times each (10 cow poses and 10 cat poses).
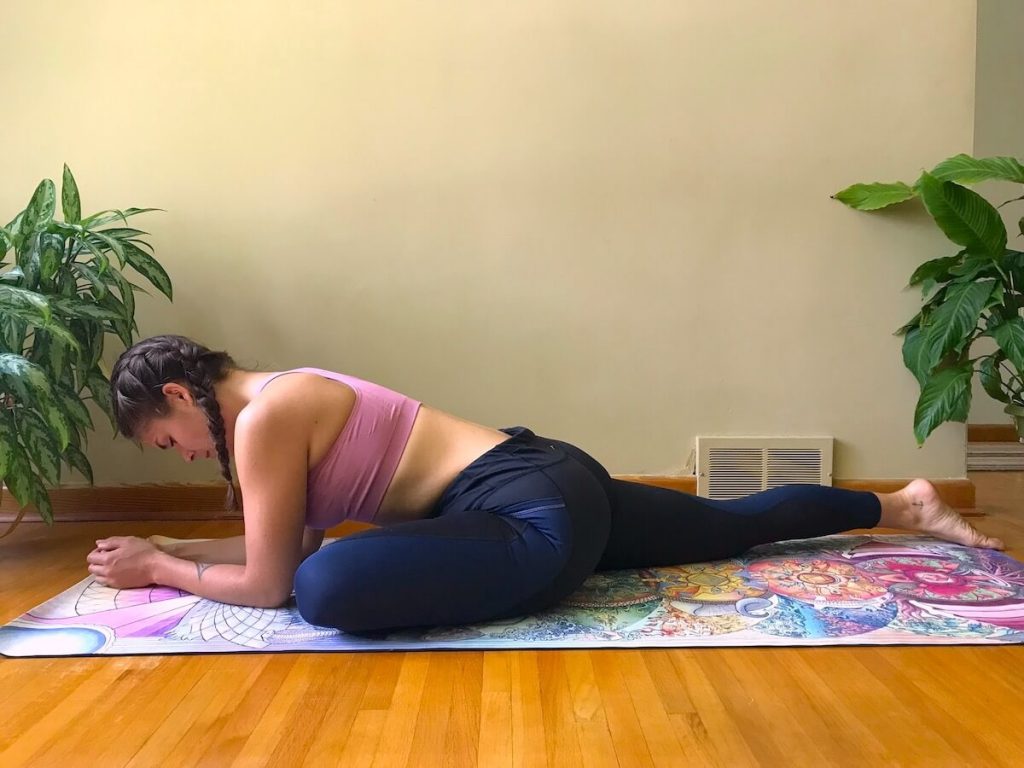
3. Child’s Pose with Blocks
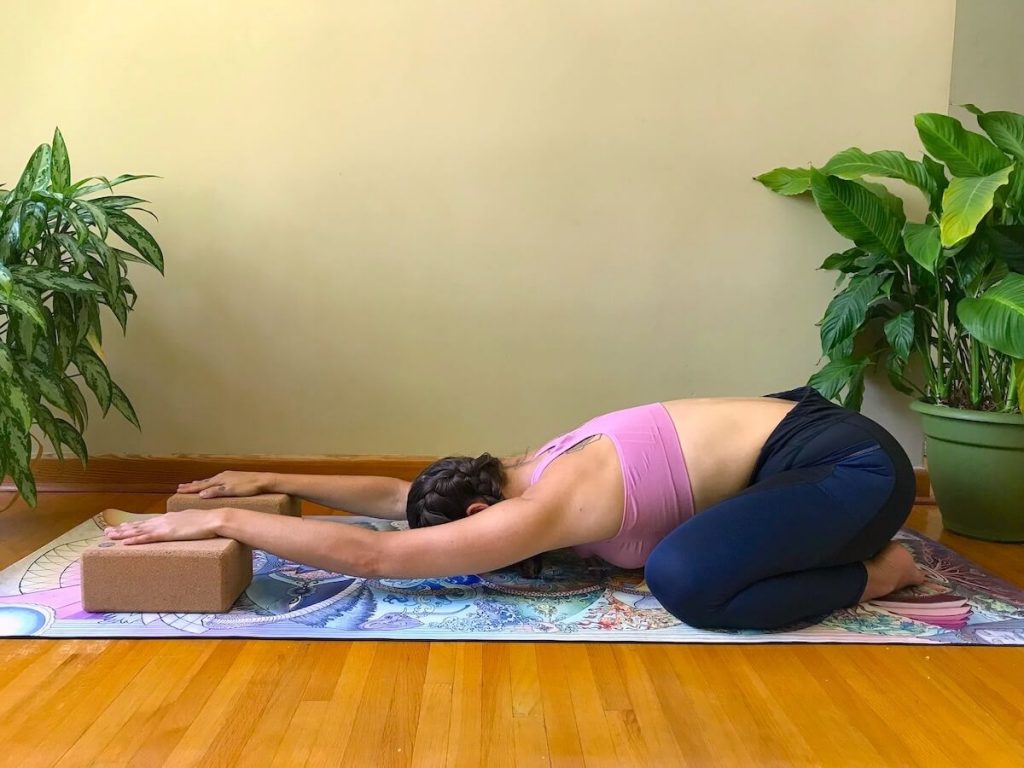
Child’s pose helps to stretch the hips, thighs, and ankles, while reducing stress and fatigue. It helps relax the muscles in the front of the body while softly stretching the muscles of the back torso.
1. Start by getting onto your hands and knees. Place two blocks shoulder-width distance apart at the top of your mat.
2. Bring your toes together so that your feet are in a V-shape and take your knees out wide. Sit your hips back onto your heels, and then walk your hands forward to lower down your chest.
3. Place your hands on the blocks, and then let your forehead rest down and close your eyes. Breathe deep here, allowing your chest to sink down further as you stretch out underneath your arms and down into the sides of your back.
4. Stay here for about 1 minute.
4. Clasped Locus
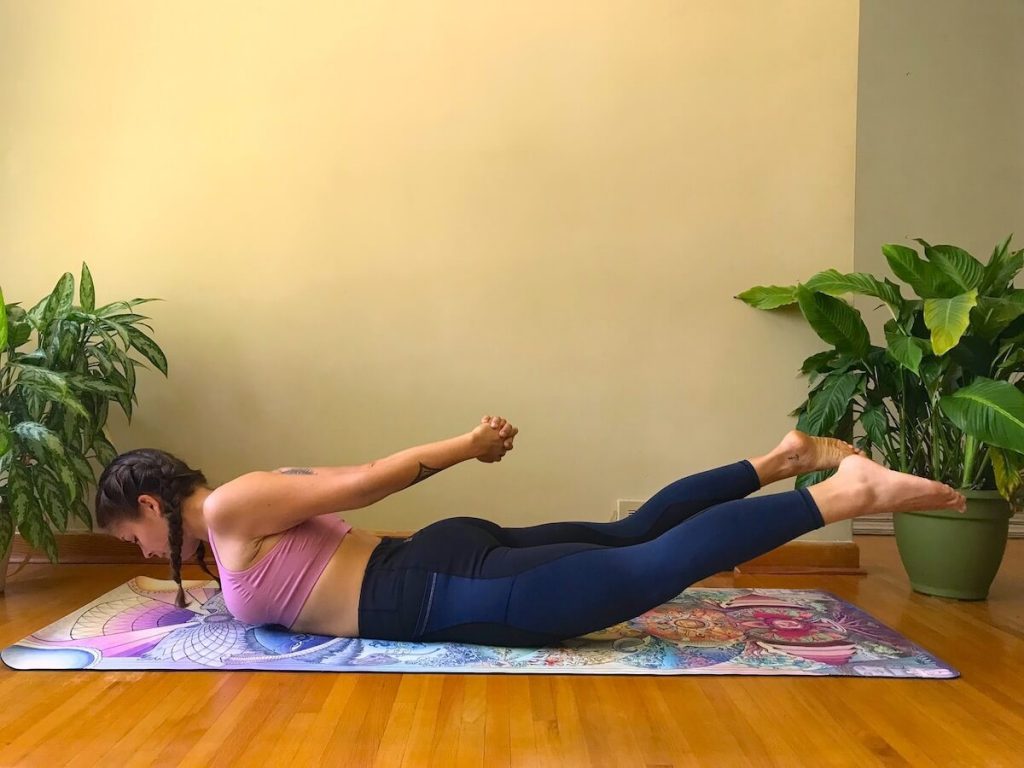
A great pose to help strengthen the muscle of the spine, buttocks, and backs of the arms and legs. By strengthening the muscles of the back, you’ll be teaching your body to hold you up right, so you don’t slouch throughout the day (which can create lots of tension in the shoulders and neck).
1. Lying on your stomach with your forehead on the mat, place your arms straight behind your back, palms together and fingers interlaced.
2. Take a full inhale and exhale. On the next inhalation, lift up your legs, head, and chest as high as possible. Make sure you keep your gaze toward the floor so that your neck remains in a straight line.
3. Keep your hands clasped, arms and wrists straight, rolling the shoulders down and back. Your toes should be pointed, and buttocks squeezed.
4. Exhale, slowly release and repeat another 5 times.
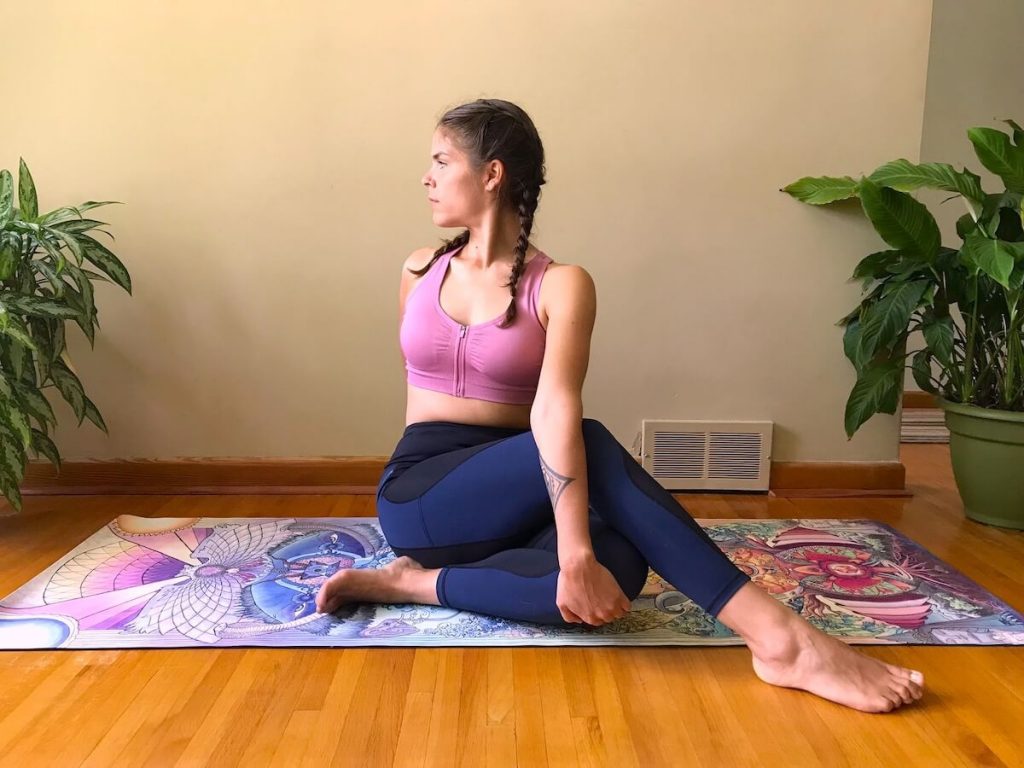
5. Supine Twist

Helps to stretch the muscles of the back, as well as the glutes. While rehydrating the spinal disks, the supine twist also lengthens, relaxes and realigns the spine.
1. Sit on the ground, with your legs extended straight out in front of you, feet flexed upward.
2. Bend your right knee and place your foot flat on the floor on the outside of your opposite knee.
3. Place your left elbow on the outside of your right knee to help you gently turn your body toward the right.
4. Hold for 30 seconds, then switch sides.
6. Supported Puppy Pose

An incredible stretch for the latissimus dorsi muscles that run along the back and sides of the body, connecting under the arms (helping to release tension in the back). Another benefit is that it helps open up the front of the chest, thereby helping relax rounded in shoulders.
1. Start on your hands and knees, with your hips stacked over your knees. Place both of your blocks down in front of your hands on the lowest height.
2. Keeping your hips in place, walk your hands towards the top of the mat, and then place your elbows on the blocks. Lower your chest towards the floor so that your forehead can rest on the mat.
3. Bring your palms to touch and bend the elbows to bring your hands behind your neck. Let your chest keep lowering toward the ground and feel a stretch in your lats, shoulders, triceps and chest.
4. Hold for 30 seconds, while breathing deep, and then slowly come out of position back onto your hands and knees. Repeat another 3 times.
7. Eagle Pose (Arms Only)
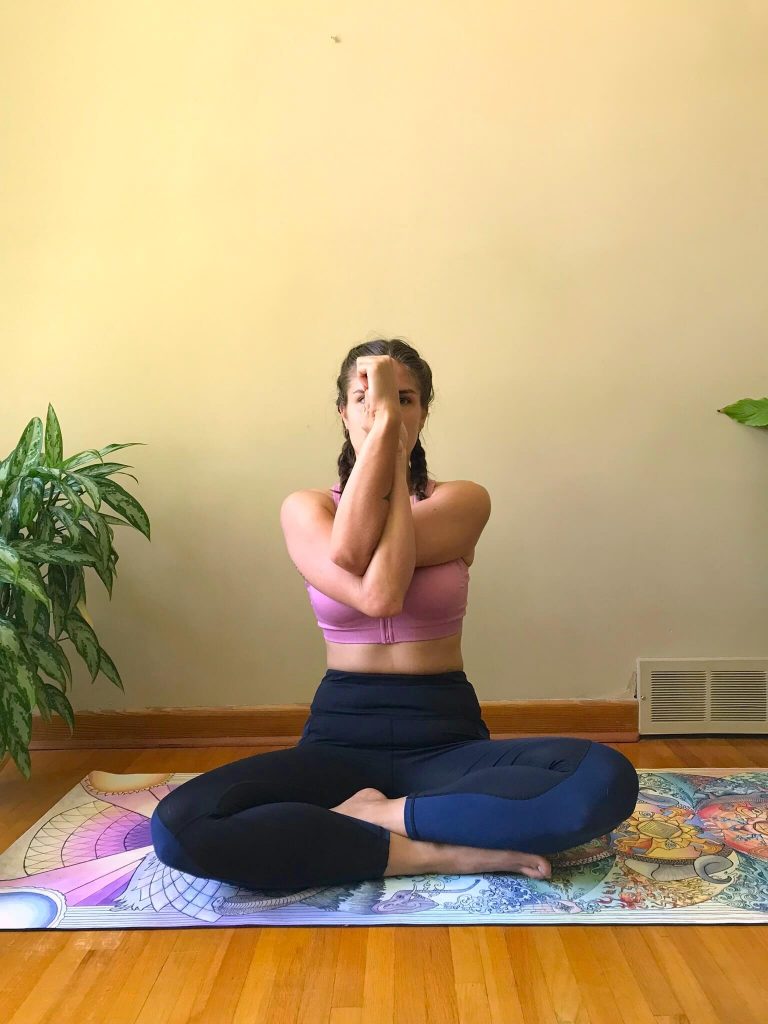
An intense stretch that helps release tension through the trapezius, outer shoulders and upper arms, as well as the shoulder blades through the upper back.
1. You can do this pose either standing up or sitting cross-legged.
2. Take your right elbow on top of the left, making sure the right elbow is snug into the crook of the left.
3. Wrap the arms around each other, clasping your fingers together or taking your palms together if you can manage.
4. Squeeze the elbows together, and relax the shoulders away from the ears, lifting the elbows up to shoulder height as you gently move the hands away from yourself.
5. Drop the chin slightly toward the chest, and breathe for 5-10 deep breaths.
6. Release and repeat on the other side. This can be done 2-3 times on each arm.
8. Pigeon Pose
Physically, this pose stretches the hip flexors, opens the gluteus minimus and maximus, and relaxes the piriformis and psoas muscles. By releasing the muscles surrounding the buttocks and hips, you’re directly releasing tension in the upper and lower back.
1. Come into a kneeling position, and draw in your left knee. Turn it out to the left so that your left leg is bent and near-perpendicular to your right one. Lower both legs to the ground.
2. Keep your right back leg extended straight behind you, and stabilize yourself with your elbows on the ground, or if you feel comfortable, fold your upper body forward and collapse over the left leg to a fully relaxed position.
3. Stay in this position and hold for 5-10 deep breaths.
4. Switch to the other side and repeat.
9. Seated Spinal Twist
A restorative pose that encourages spinal mobility. While you twist in the posture, you’re helping realign your spine.
1. Sit on the mat or floor, legs straight out in front of you.
2. Inhale and bring your knees up close to your chest, both feet on the floor.
3. Drop your left leg down, resting the foot against the right buttock.
4. Lift your right leg and place it over your left leg, knee toward the ceiling, right ankle by the left knee.
5. Draw your right leg toward the body. Do this only as much as your body allows you.
6. Inhale, and then on the exhale, bring your left elbow to the outside of the right knee as you twist toward the right.
7. Hold the pose for 30 seconds, breathing slow and deep. Repeat on the other side.
10. Cow Face Arms
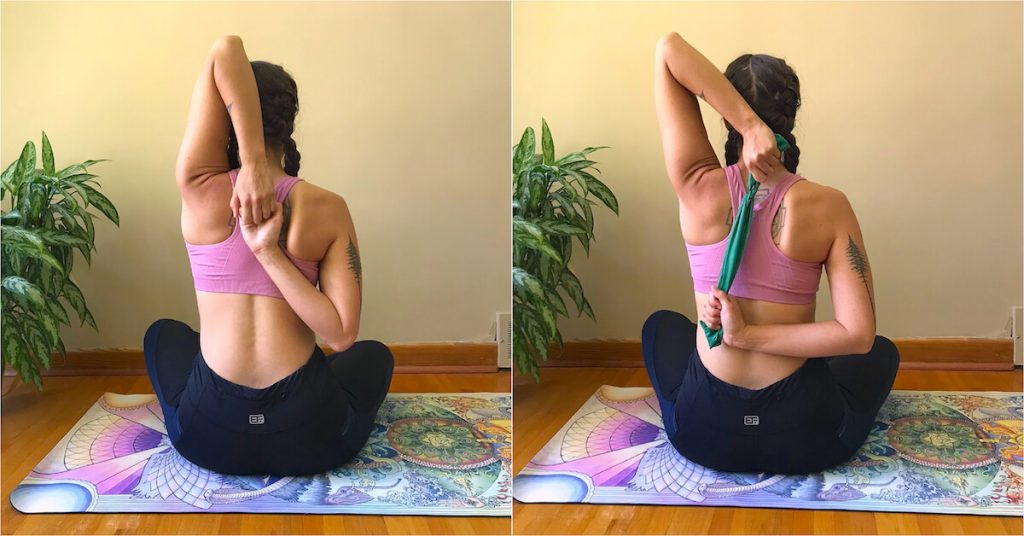
A deep stretch that helps to open the shoulders, armpit, chest, deltoid and triceps. This pose can be difficult for people with tight shoulders, so I’ve added an alternative version that can be done with a towel or exercise band.
1. Get into a seated position on the floor, in whichever way is comfortable for you. I prefer cross-legged position.
2. Extend your left arm up toward the ceiling with your palm facing forward. Then, bend your left elbow and bring your left hand to your spine.
3. Extend your right arm to the side with your palm facing down. Internally rotate your arm so that your palm faces behind you. Then, bend your right elbow and bring your right hand up the center of your back.
4. Roll your shoulders back and down, and hook the fingers of both hands if possible. If you cannot clasp your hands, use a towel or exercise band to connect the hands as pictured.
5. Keep reaching your top elbow toward the ceiling, while reaching your lower elbow toward the floor. Keep both elbows drawing in toward the body. Do not extend them out to the sides.
6. Draw in your lower ribs – do not let them protrude forward. Keep your shoulders away from your ears, in a relaxed position.
7. Hold the pose for up to 1 minute, and then gently release your arms. Repeat on the opposite side.
11. Rag Doll
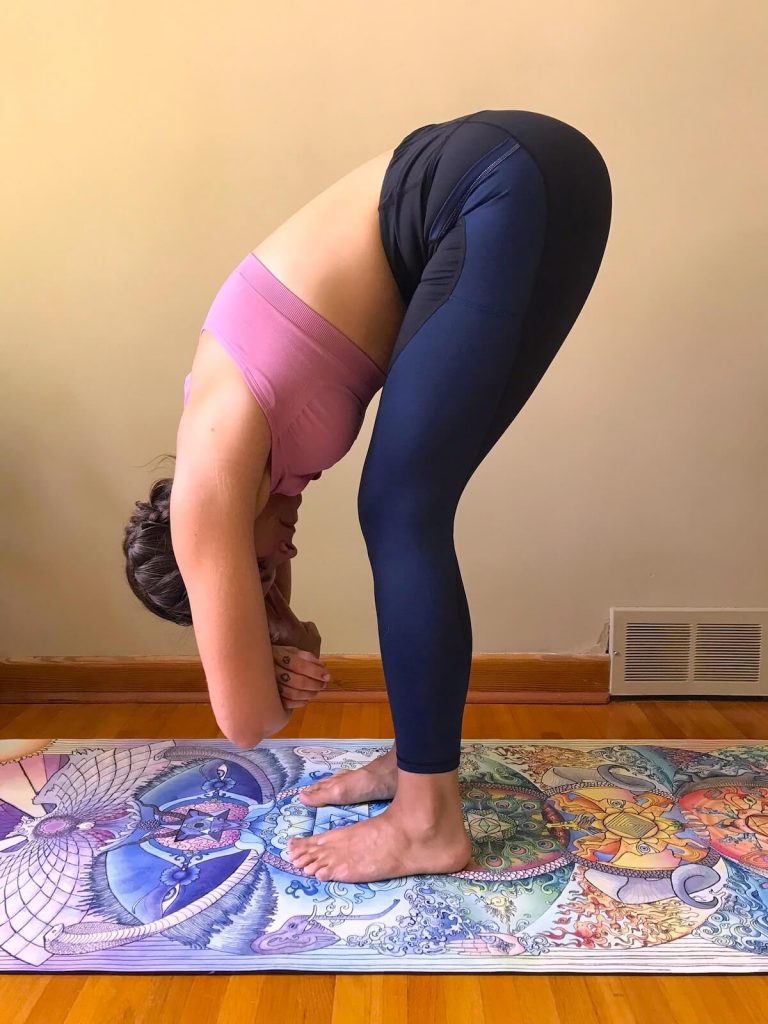
Helps to open the lower back and hamstrings, while building more flexibility in the spine.
1. Begin with feet hip-width apart and the knees flexed. Bend forward from the hips, allowing the head to hang down between the upper arms.
2. Cross the arms and gently grasp each elbow with the opposite hand. To release the back, gently sway from side to side.
3. Stay here for 5 long deep breaths, and then come back to standing position.
Where to Purchase The Epic Yoga Mat
You might have been wondering this whole time – “where did she get that yoga mat?” It is definitely one of a kind!
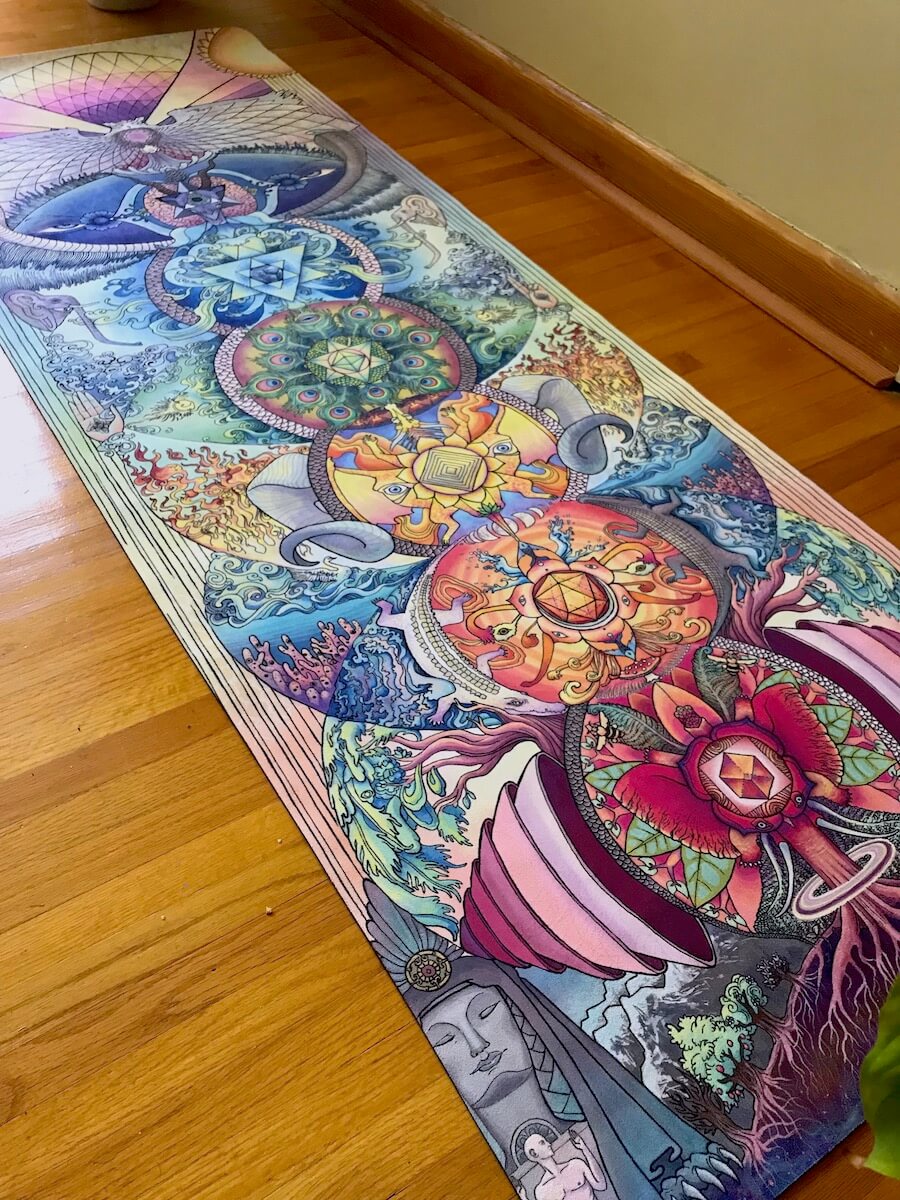
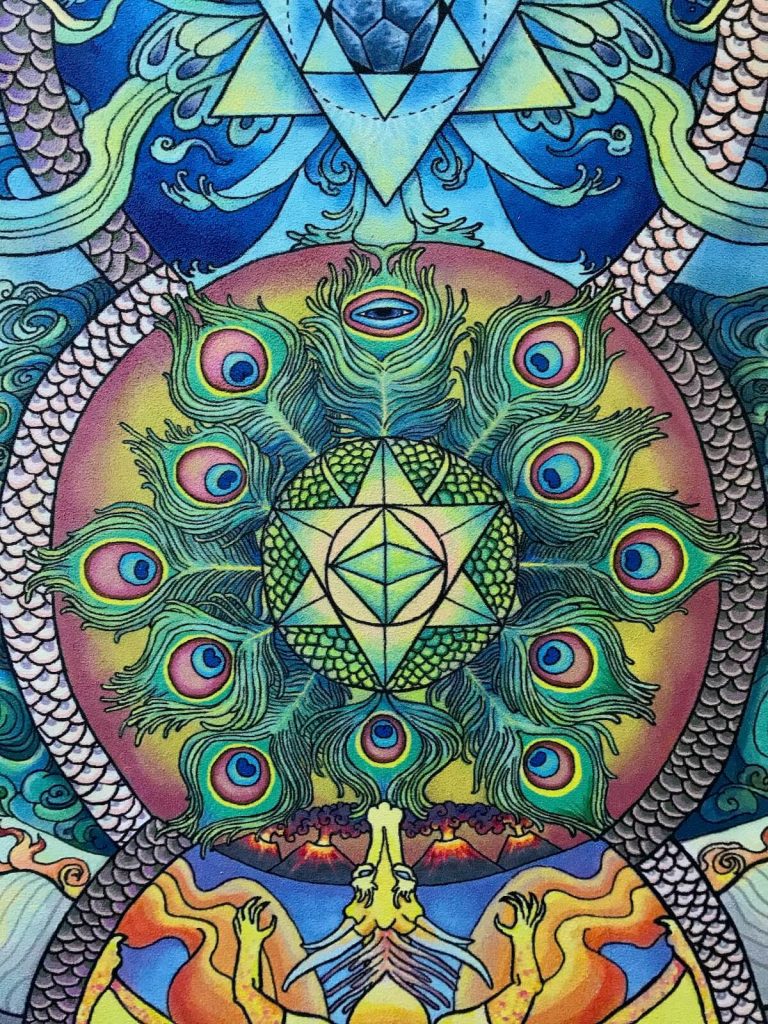
The artwork printed on the yoga mat is actually designed and created by a friend of mine, Danielle Caners. It is such a joy to inspect and meditate on the images while going deep into different stretches and poses. I think I find something new in the yoga mat every time I spread it out to get my stretch on.
I collaborated with Danielle to offer my readers a limited time offer of 15% off any yoga mat (or print) on her website (the yoga mat that I have pictured in the photos above is called “Waking Life”).
What I also love about Danielle’s yoga mats is that they’re made out of an ultra-soft micro-fiber surface, and printed using water-based inks (and trust me – the ink is very true to color. I’ve never seen something so vibrant in my life!). They’re also contain a natural tree-rubber bottom, which is completely biodegradable and they’re free of PVC and phthalates – two harmful chemicals found in most standard yoga mats.
I found very little trouble gripping my feet on the mat, and if I was extra dry that day, a simple spritz of water on the mat made it super easy to grip onto. For any of you who practice hot yoga, or practice in a very warm room, you probably won’t have any issues!
If you want to support an incredible artist, and need a little more encouragement to start stretching, these yoga mats will help you with just that. If you want to check out some more of her artwork, or yoga mats, you can find it on her website, or over at Instagram.
Get an exclusive 15% off discount when you use the code “LIVELOVEFRUIT” at checkout here.