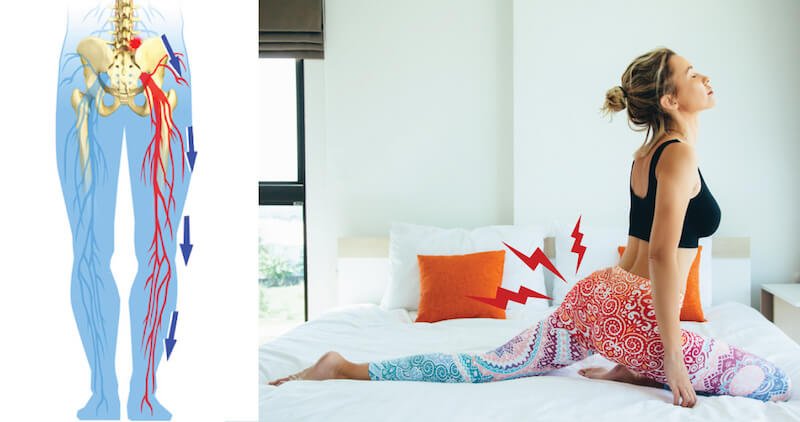
Sciatica pain is not to be taken lightly. It is one condition, where no matter what you try, it just keeps coming back.
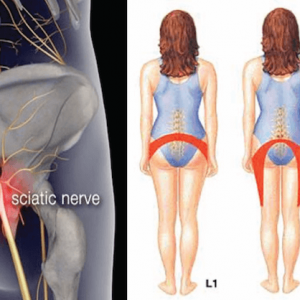
Sciatica pain is an agonizing pain that can be felt all the way from your upper thighs to your feet. It can cause lower back pain, which radiates all the way through your buttock. It is closely related to piriformis syndrome, since the piriformis muscle runs right next to the sciatic nerve (in some people, the nerve even runs right through this muscle).
The sciatic nerve is the single largest nerve in the body, so it makes sense why discomfort in this nerve can quite literally ruin your day.
What is Sciatic Nerve Pain?
When the sciatic nerve and surrounding nerves become inflamed or pinched, intense pain develops and runs along the entire length of the legs. Sciatic nerve pain is repetitive, and is often only felt in one leg. Most people find the pain intolerable, comparing it to something similar to a bad toothache that won’t go away.
7 Gentle Yoga Poses to Fix Sciatica Pain
While many people turn to surgery or pain-reducing medications to alleviate their sciatic nerve pain, studies have shown that yoga and other gentle stretching exercises are safe and effective methods for people with sciatic nerve pain (1).
Dr. Mark Kovacs, a certified strength and conditioning specialist states that the best way to alleviate most sciatica pain is to do “any stretch that can externally rotate the hip to provide some relief.” Reclining pigeon pose is one example of this kind of stretch.
While performing the following poses, be sure to breathe deep and never rush into a pose. Always be gentle with your body. The poses below have modifications for beginners, but if you feel like you aren’t feeling a stretch in the beginner pose, give a try at the advanced (full expression) of the pose.
You do one repetition of these stretches, or you can repeat all 7 a second and third time for longer-lasting effects.
1. Child’s Pose
Advanced
1. Kneel on the floor and allow your big toes to touch.
2. Separate your knees as wide as your hips (or as far as is comfortable).
3. Fold your torso forward and allow your arms to either rest at your sides, or stretched out in front of you.
4. Stay here for 5 deep breaths.
Beginners
Child’s pose is a pretty basic stretch, but if it is difficult for your head to touch the ground, you can place a pillow or yoga block under your buttocks and head. If your knees hurt in this pose, use a doubled up blanket or yoga mat under the knees.
2. Supine Figure 4
Advanced
1. Lay on your back on the floor. Bend both knees and place your feet on the floor.
2. Take the leg that you want to stretch and cross it over the opposite knee.
3. Raise the opposite thigh that your leg is on top of, and grab behind your thigh with both hands.
4. Pull the thigh forward toward your body and hold for 30 seconds, gradually progressing to 60 seconds.
Beginners
While the above variation is similar to advanced, this video explains how to go about the stretch if you have sensitive knees.
3. Pigeon Pose
Advanced
1. Start in a downward-facing dog with your feet together.
2. Draw in your left knee and turn it out to the left so that your left leg is bent and near-perpendicular to your right one. Lower both legs to the ground.
3. Keep your right back leg extended straight behind you, and stabilize yourself with your elbows on the ground, or if you feel comfortable, fold your upper body forward and collapse over the left leg to a fully relaxed position.
4. Stay in this position and hold for 5 to 10 deep breaths.
5. Switch to the other side and repeat.
Beginners
For the beginners version of this pose you’ll essentially be getting into the same position as above, except this time you’ll need a yoga block or thick pillow to place underneath your chest. You’ll also need a thick towel or doubled up yoga mat to place under your knee that is on the floor. If you can’t bend forward, just stretch as far your body will allow you.
You can also try the variation below, where the knee that is behind you is bent at an angle so that your hips aren’t flush to the ground.
4. Butterfly Pose
Advanced
1. Sit on the ground, and bend both knees. Bring your feet together and use your hands to open up your feet like a book. Use your leg muscles to press your knees down toward the floor.
2. Keeping the spine straight, relax the shoulders and then slowly fold forward, while breathing deeply. Remember to keep the spine straight. If you can only bend forward a few inches, that is fine, sit here and breathe.
3. If you want a deeper stretch, extend the arms out in front of you on the floor. Stay here for 5 deep breaths, and then return to starting position.
Beginners
If the above pose hurts your sit bones (the bones you sit on in your bottom), put a soft blanket underneath your buttocks. If you don’t want to go into the full expression of the pose, you can put your feet together, but instead of moving them close to the groin, keep them further from your body to prevent any strain in the knees and hips. Eventually, over time, you’ll want to inch your two feet closer to the groin area and bend forward to get a deep stretch in the buttocks and hip area.
5. Head-to-Knee Forward Bend
Advanced
1. Sitting on the floor, with your legs extended out in front of you, bring the sole of your left foot to the inside of your right thigh.
2. Align the centre of your torso with your right leg. Keeping your spine long, exhale as you hinge forward from the hips to fold over your right leg. Draw your right thigh down and flex your foot.
3. Hold onto your right leg’s ankle or foot, and with each inhalation, lengthen the front torso. With each exhalation, fold deeper.
4. Hold for 30 seconds, release, and repeat on the opposite side.
Beginners
For the beginners version of this pose, instead of holding onto your right leg’s ankle or foot, hold onto your shin (or essentially, wherever you can reach that feels okay in your body). You can also wrap a yoga strap or towel around the sole of your foot and hold it firmly with both hands (like in the video above).
If you find your hamstrings or low back are extremely tight, place a rolled-up blanket or yoga mat beneath the knee of your extended leg.
6. Seated Spinal Twist
Advanced
1. Sit on the ground, with your legs extended straight out in front of you, feet flexed upward.
2. Bend your right knee and place your foot flat on the floor on the outside of your opposite knee.
3. Place your left elbow on the outside of your right knee to help you gently turn your body toward the right.
4. Hold for 30 seconds, then switch sides.
Beginners
For a beginners version of this pose, you can keep your hand that is wrapped behind your back, on the floor instead. If you can’t grasp your foot with the other hand, you can simply hold your outer knee. If this is not possible, you can put your palm on your buttocks or outer thigh. You can also use a yoga block or thick pillow under the hand that is behind the back. Another variation would be to keep your left leg flat out and not bent. The video above describes every variation of this pose.
7. Bridge Pose
Advanced
1. Lie on your back with your knees bent and the feet flat on the floor, hip-width apart.
2. If you have two yoga blocks, place one between your feet, and second one between your knees. The blocks make sure that your thighs remain parallel throughout the pose, which prevents the psoas muscles from externally rotating (which can cause back pain).
3. Start to lift your pelvis off the floor, pressing your pubic bones upward.
4. Hold the pose for 20-30 seconds, then release.
Beginners
There aren’t many variations for this pose, as the original pose is essentially a beginner’s pose. As mentioned above, if you have yoga blocks, you can place one between your knees, and one between your feet to prevent the psoas muscle from externally rotating (which can cause pain in the back).


Hi, the Beginners video for Head-to-Knee Forward Bend is missing! Cheers
I’ll get that fixed!