
If you suffer from piriformis pain, it can be very frustrating.
It manifests as hip pain while sitting, numbness that never seems to go away, pain that radiates down your hamstring and spasms that shoot down the back of your leg from your hip.
There are a variety of exercises and stretches out there to help ease piriformis pain, but not many of them actually take into account the science behind the piriformis muscle and why you’re experiencing this pain.
So to start, lets look at what’s going on underneath your skin so that you can target the pain with the proper exercises to speed yourself on the road to recovery.
What Is The Piriformis Muscle?
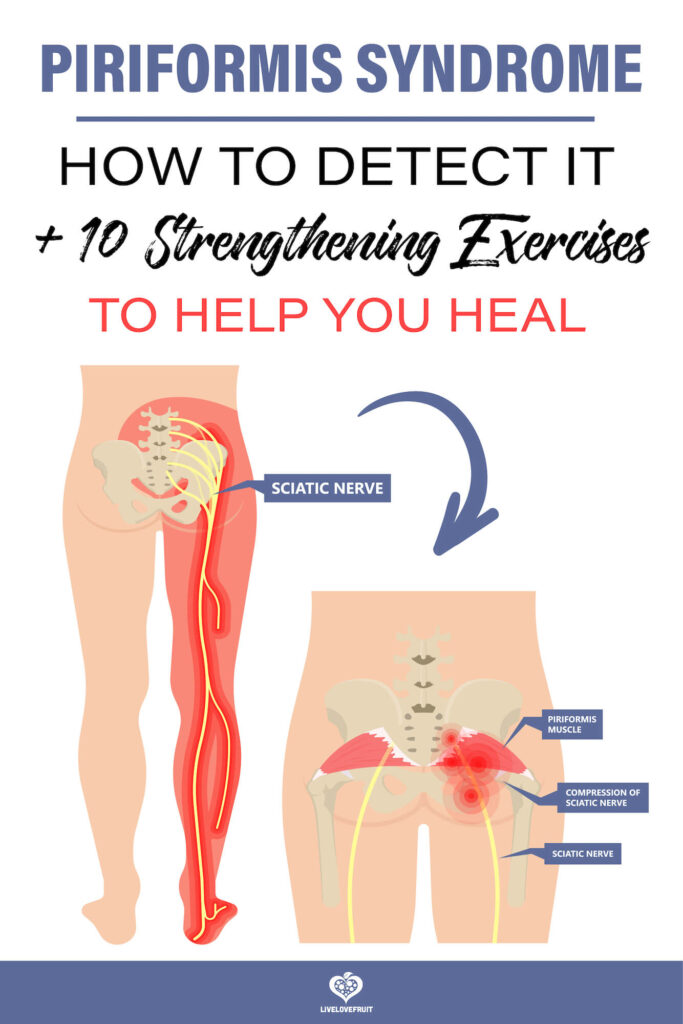
The piriformis muscle is a small muscle located deep in the buttock behind the gluteus maximus. It starts at the lower spine and connects to the upper surface of each femur (thighbone). It runs diagonally with the sciatic nerve, running vertically directly beneath it (however in some people, the sciatic nerve runs right through the muscle).
The piriformis muscle functions to rotate the hip and turns the leg and foot outward. Unfortunately, it also plays a central role in a complicated and frustrating injury called piriformis syndrome.
The Sciatic Nerve
The sciatic nerve runs from the base of your spine along your gluteal muscles and down the back of your legs. It provides a signal to the muscles on the backside of your lower body to fire when needed.
The piriformis muscle is also positioned right next to the sciatic nerve, which is where problems can arise. When the piriformis muscle becomes irritated, pressure gets put on the sciatic nerve, making it irritated as well. In individuals whose sciatic nerve runs right through the piriformis muscle, pain in this area becomes much more common.
What Is Piriformis Syndrome?
Piriformis syndrome occurs when the sciatic nerve is compressed and/or irritated by a tight and/or inflamed piriformis muscle. It is also sometimes called “pseudo sciatica,” as it is often confused with pain in the nerve resulting from a disc bulge in the lower back.
When experiencing piriformis syndrome, you may experience one or more of the following:
- Pain, aching, and tightness in the buttocks, usually only on one side. This is commonly felt with prolonged sitting (to avoid pain, you may instinctually sit lopsided, with the sore buttock tilted up).
- Pain that is aggravated by hip activity, such as running or walking (sometimes you’ll walk with the foot turned out due to shortening of the piriformis muscle).
- Pain, tightness, tingling, weakness, or numbness can also radiate into your lower back, down the backside of your leg, and through the hamstring and calves.
Piriformis Syndrome or Something Else?
It can sometimes be hard to distinguish between piriformis syndrome or something else that might be triggering the problem in your buttock or lower leg.
Sometimes a herniated disc in your lower back can put pressure on your sciatic nerve, causing a similar type of pain that radiates down the back side of your leg. Spinal stenosis, as well as other pelvic and lower back issues can also cause a similar feeling of pain.
Sometimes only an MRI or CT scan can help rule out whether it is a herniated disc issue or a piriformis problem. However, one study outlined the four most common findings in patients with piriformis syndrome among 55 studies they examined. These are:
- Pain in the buttock/piriformis area
- Worsening of the buttock and sciatica-like pain with prolonged sitting
- Tenderness at a specific spot in the pelvis between the sacrum and the top of the femur
- Aggravation of pain when the hip and leg are positioned to put tension on the piriformis muscle
The video below explains what the last point on the list is talking about. You can perform this exercise to narrow down if your pain is coming from the piriformis muscle:https://www.youtube.com/embed/sEu4jhBnIAs
Treating Piriformis Syndrome
There are several different stretching and strengthening exercises you can use to help treat and get rid of piriformis syndrome. The following series will actually help get rid of your pain, starting with the first two piriformis stretches, which yes, actually work!
Remember, don’t be overly aggressive with these stretches, and take your time. You do not want to irritate the piriformis anymore than it already is. Remember to breathe deeply and ease into the stretches, stopping if you feel any sharp pain.
1. Supine Piriformis Stretch with Crossover
1. In the video, the stretch starts at 24 seconds in.
2. Lay on your back on the floor. Bend both knees and place your feet on the floor.
3. Take the leg that you want to stretch and cross it over the opposite knee.
4. Put on hand on top of your knee, and the other hand over your ankle.
5. Slowly pull toward your opposite shoulder, until you feel a stretch right through your glutes. Hold for 30 seconds, and gradually progress to 60 seconds.
6. Do 3 sets of 5-10 repetitions, 2-3 times per day.
2. Supine Piriformis Stretch without Crossover
1. In the video, this stretch starts at 1:00.
2. Lay on your back on the floor. Bend both knees and place your feet on the floor.
3. Take the leg that you want to stretch and cross it over the opposite knee.
4. Raise the opposite thigh that your leg is on top of, and grab behind your thigh with both hands.
5. Pull the thigh forward toward your body and hold for 30 seconds, gradually progressing to 60 seconds.
6. Do 3 sets of 5-10 repetitions, 2-3 times per day.
Strengthening exercises are also recommended by many researchers doing work surrounding the issue of piriformis syndrome. Strengthening the piriformis muscle and other hip muscles that surround it will help treat piriformis syndrome and prevent it from coming back.
Combine the above stretching exercises with the strengthening exercises below can help address piriformis muscular tightness and weakness.
Phase 1:
Do these exercises for four weeks. Eventually, you will want to progress over time to 3 sets of 15 repetitions of each exercise. You will need a resistance band to help with resistance as a form of strengthening.
3. Glute Bridge (with band for resistance)
1. Loop a mini band around your legs, just above your knees and lie face-up on the floor with your arms at your sides.
2. Bend your knees at 90 degrees, both feet on the floor.
3. Contract your glutes to raise your hips off the floor until your knees, hips and shoulders are all in a straight line.
4. Pause, then lower back down. Do 15 repetitions and perform 3 sets.
4. Clamshell Leg Lifts (with band for resistance)
1. Place the resistance band around your knees.
2. Lay down with your knees pointed forward and bent at a 90 degree angle.
3. Lift your top knee upwards, about 10 inches, keeping your top foot in place against the bottom foot.
4. Lower your knee back down to the bottom knee.
5. Repeat 15 times, and perform 3 sets.
Phase 2:
After four weeks of doing the above exercises (3 and 4), do all phase 1 exercises, and while adding the following. Eventually, you will want to progress over time to 3 sets of 15 repetitions of each exercise.
5. Standing Mini Squats (with band for resistance)
1. Place a resistance band just above your knees for this exercise, otherwise, you can do it without.
2. Hold onto a counter or table for support if you need.
3. Stand straight with your feet directly under your hips, feet turned slightly outward.
4. Squeeze your buttocks together and slowly bend your knees to lower your body just a few inches.
5. Keep your feet flat and do not allow your knees to go in front of your toes. Do little squats, not deep squats.
6. Do 15 repetitions for a total of 3 sets.
6. Monster Walk Side Steps (with band for resistance)
1. Place a band around both ankles, or around both knees. There should be enough tension that the band is tight when your feet are shoulder width apart.
2. To begin, take short steps forward, alternating your left and right foot.
3. After several steps, do the opposite, and walk backward to where you started. This is one repetition.
4. Do 15 repetitions for a total of 3 sets.
7. Single-Leg Mini-Squats
1. Start standing on one leg, with your core engaged, spine tall and shoulders back.
2. Slowly bend your knee over your toes, making sure your knee cap stays in the middle of each foot. You will feel the muscles work at the front of your thigh. You can use a mirror if it helps to see what you are doing.
3. Make sure your knee doesn’t bend inwards, your hip doesn’t fall outwards, and instead your hip, knee and foot stay in a vertical line.
4. Do 15 of these and perform 3 sets.
Phase 3:
After four weeks of doing the above exercises (phase 1 and 2 combined), do all phase 1 and 2 exercises, while adding the following. Eventually, you will want to progress over time to 3 sets of 15 repetitions of each exercise.
8. Lunges
1.Start by standing up comfortably and step ahead with one foot.
2. Lean forward until your knee reaches a 90 degree angle and your rear knee is parallel to the ground.
3. Keep your back in a neutral position, but don’t flatten the curve of your lower back. Make sure your knee doesn’t go beyond your toes and that your knee stays entered over your foot. Do not let your knee roll inward or outward.
4. Stay here for a moment, then return to starting position.
5. Do 15 repetitions, and perform 3 sets.
9. Deep Squats
1. Stand with your feet a little wider than shoulder-width apart, hips stacked over the knees, and knees over the ankles.
2. Roll your shoulders back and down, away from your ears. Your back shoulder be straight and not rounded.
3. Extend your arms out straight so that they are parallel with the ground, palms facing down.
4. Inhale, and bring your hips back as the knees begin to bend (as if you were sitting in a chair).
5. When your butt starts to stick out, make sure your chest and shoulders stay upright, and the back stays straight.
6. Work up to a squat so that your hips eventually sink below the knees (you may need to work up your flexibility to do so).
7. Engage your core, and with your bodyweight in the heels, come back into standing.
8. Do 15 repetitions, for a total of 3 sets.
10. Resistance Band Abduction
1. Attach one end of a resistance band to something stationary, and stand sideways on to the attachment point.
2. Wrap the end of the band around the ankle furthest from the attachment point.
3. Start with your legs together, and begin by moving the working leg out to the side, as far as possible from the standing leg.
4. Try to keep the hips level throughout.
5. Return to starting position and repeat 15 times. Do a total of 3 sets.
Sources:
https://www.spine-health.com/conditions/sciatica/what-piriformis-syndrome
https://runnersconnect.net/piriformis-syndrome-running/
http://jaoa.org/article.aspx?articleid=2093614
http://physioworks.com.au/injuries-conditions-1/piriformis-syndrome
https://www.ncbi.nlm.nih.gov/pmc/articles/PMC2997212/


I believe I'm suffering from periformis syndrome it's been going on for 2 years now I am going to try these exercises and pray it works
I hope they work for you!
How are they working for you?
I just found this and it looks like a great starting place for me to try and alleviate the pain in my back and hip. I am sure some of it at least is my piriformis acting up. Thanks for making this a simple routine!
Of course! Glad they helped 🙂